This site uses cookies to improve your experience. To help us insure we adhere to various privacy regulations, please select your country/region of residence. If you do not select a country, we will assume you are from the United States. Select your Cookie Settings or view our Privacy Policy and Terms of Use.
Cookie Settings
Cookies and similar technologies are used on this website for proper function of the website, for tracking performance analytics and for marketing purposes. We and some of our third-party providers may use cookie data for various purposes. Please review the cookie settings below and choose your preference.
Used for the proper function of the website
Used for monitoring website traffic and interactions
Cookie Settings
Cookies and similar technologies are used on this website for proper function of the website, for tracking performance analytics and for marketing purposes. We and some of our third-party providers may use cookie data for various purposes. Please review the cookie settings below and choose your preference.
Strictly Necessary: Used for the proper function of the website
Performance/Analytics: Used for monitoring website traffic and interactions
I had tried the mask method already with no luck… but you mentioning it here pushed me to go try it some more… actually, I still had no luck using the graphic stencil… but the graphic ellipse did the trick perfectly! You saved me so much time!
Screen Space Post-Processing In this stage, suitable image processing algorithms are used to apply special processing to the rendered scene, enhancing the graphics. As we can see, in Deferred Rendering, the calculation of a pixel’s color is uniformly performed in the lighting phase. which is where the term “Deferred” comes from.
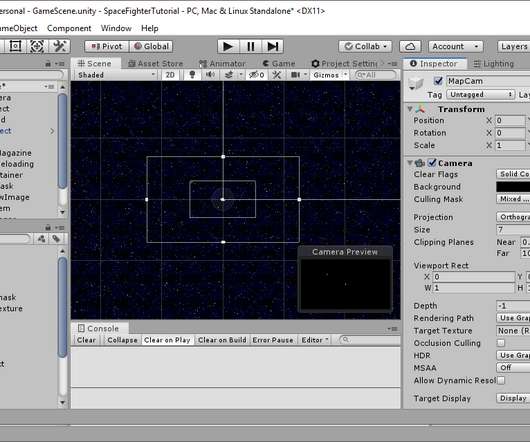
Then set the pixels per unit to 64 and click apply to update the sprites. This will be the mask which shows or hides part of our map based on the alpha value of the mask texture we will add. Masking allows us to show only a portion of a texture based on the alpha value of another texture. This will display our render texture.
It feels great to be back to doing graphics programming after two months refactoring the core engine. Godot uses clustered decals, so the cost is very low (the pixel is shaded only once and there are no extra draw calls for each decal). Alpha is still some months away, but it's getting closer every day!
Running the whole graphics rendering in a separate thread. Given the high control we have over the shader compiler, we can: Detect when shaders write to the alpha channel and automatically make the surface go via the transparent pipeline. Great alpha blending support. This approach also has several more advantages. Light setup.
Enable the use of any-hit shaders only for those geometries that need it; for example, to do alpha testing. Invoking any-hit shader, typically for performing alpha testing, for non-opaque triangles interrupts hardware intersection search. Consider alpha testing instead of blending. Do this whenever possible.
This is a screenshot that displays the object-space position of each pixel as the color. That was fixed by reflecting the view-vector with the normal of the current pixel. It halves the resolution of the image until there's only one pixel left. That's not really that interesting to look at, so let's try to use SOME MATH!!!
We organize all of the trending information in your field so you don't have to. Join 5,000+ users and stay up to date on the latest articles your peers are reading.
You know about us, now we want to get to know you!
Let's personalize your content
Let's get even more personalized
We recognize your account from another site in our network, please click 'Send Email' below to continue with verifying your account and setting a password.


Let's personalize your content