This site uses cookies to improve your experience. To help us insure we adhere to various privacy regulations, please select your country/region of residence. If you do not select a country, we will assume you are from the United States. Select your Cookie Settings or view our Privacy Policy and Terms of Use.
Cookie Settings
Cookies and similar technologies are used on this website for proper function of the website, for tracking performance analytics and for marketing purposes. We and some of our third-party providers may use cookie data for various purposes. Please review the cookie settings below and choose your preference.
Used for the proper function of the website
Used for monitoring website traffic and interactions
Cookie Settings
Cookies and similar technologies are used on this website for proper function of the website, for tracking performance analytics and for marketing purposes. We and some of our third-party providers may use cookie data for various purposes. Please review the cookie settings below and choose your preference.
Strictly Necessary: Used for the proper function of the website
Performance/Analytics: Used for monitoring website traffic and interactions
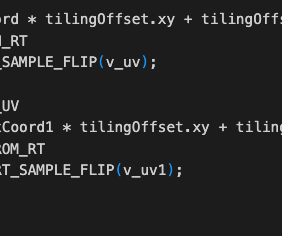
The vertical axes of textures and picture pixels is shown above, when sampling textures in shaders, that is from top to bottom, which is top-right corner. If your previous development experience is based on OpenGL, you may find that the texture on your grid is vertically flipped. the RGB of the color will be multiplied by 0.5
Thus I make an effort to use purchased art assets only as a starting point to then be modified into something more unique and fitting of the aesthetic.” “We built a prototype in our spare time and saw the potential. That’s very different to most games that tend to use hundreds of textures and multiple materials.
To see the available shaders first we need to create a material by Right Click -> Create -> Material: After we create the material, select it by Left Clicking on it, then in the Inspector tab you can see its options. Now that we have the shader, create a new material by Right Click -> Create -> Material.
For example, there’s no point trying to fine-tune your shader if the real problem is that you have low GPU utilization because you have lots of tiny dispatches with barriers between them all. In the Analysis panel of GPU Trace (Figure 2), double-click or hover over the marker for the range to analyze, in this case, DispatchRays[0] : Figure 2.
Fixed a bug where preview clicks in the editor were misaligned when the window scaling was not set to 1. Fixed a bug where the localized editor could not be used. Enhanced scene view selection logic for prefabs: First click selects the prefab root node. Subsequent clicks prioritize the target point and gradually select upward.
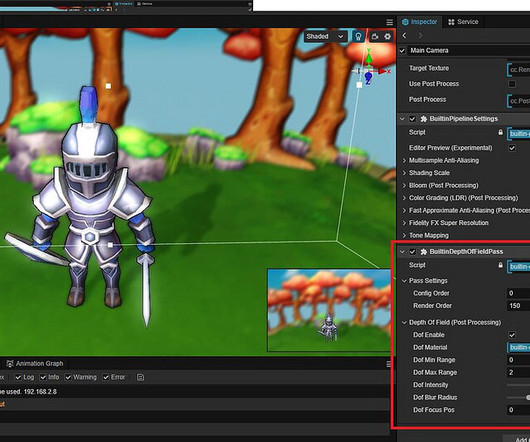
See the documentation “Render Debugging - Run Time Using Render debugging”: [link] • When the node animates, add the tween ‘destroySelf’ method to destroy the front nodal point. Fixed native side LOD screen share calculation using local coordinates, causing calculation error. Skip rendering when the UI element Opacity is 0. Fixed Mat4.getRotation
Open Device Manager : Click the Start menu, type Device Manager , and open it. Find Graphics Card : Click Display adapters to see your graphics card. Update Driver : Right-click your graphics card, select Update driver , then choose Search automatically for updated driver software. Services Tab : Click on the Services tab.
That’s why they can become choke points if there’s too much to load or if something interrupts the process. Right-click the game and select Check for updates or look for an Update button. Right-click on it and choose Properties. Click Apply then OK , and run the game again to see if the issue persists.
Start Menu : Click the Windows icon on your screen. Expand Display Adapters : Click the arrow next to Display Adapters. Graphics Card : Right-click your graphics card’s name. Update Driver : Click on Update driver. End Processes : Click on a program and hit End Task at the bottom.
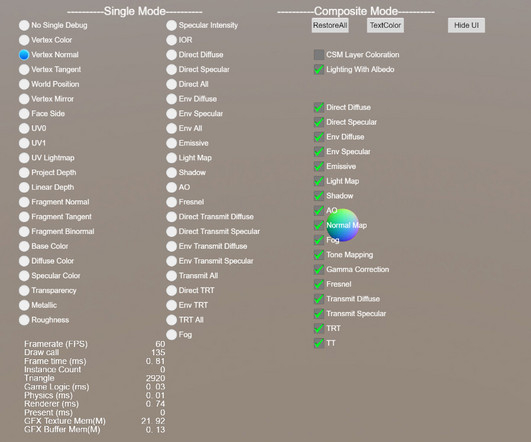
To ensure visual quality, consistency across platforms, adherence to artistic and design integrity, validation of user interfaces, localization, regression testing , and problem discovery, image-based testing becomes crucial. Games frequently follow creative and design principles. For instance, Focus on the image in (Figure 1.1)
Since we previously did not version our Android plugin systems, this new one is now labelled v1 , and is the starting point for the modern Godot Android ecosystem. Better handling of Variant s pointing to released Object s. Updated and localized documentation. This new plugin system is backward-incompatible with the 3.2/3.2.1
Expand Display adapters, right-click your graphics card, and hit ‘Update driver.’ Right-click Broken Roads and choose Properties. Click the Local Files tab and select Verify Integrity of Game Files. Right-click on each non-essential application and select Disable. Open your game library on Steam.
Right-click your graphics card and choose Update driver. Right-click Football Manager 2024 and choose Properties. Click the Local Files tab. Right-click on each non-essential application and select Disable. Right-click on each one and select End Task to close them. Right-click it and select Properties.
Update Graphics Driver I make it a point to regularly update my graphics driver , as it’s often the key to solving many gaming issues. Open Device Manager : Click on the Start menu, type Device Manager , and open it. Find Your Graphics Card : Click on Display adapters to see your graphics card.
Right-click on it and select Properties. Verify The Invincible’s Game Files I always make it a point to verify the game files if I encounter any glitches or crashes. Go to the Library section and right-click on The Invincible. Select Properties , then navigate to the Local Files tab. Click on Gaming.
Right-click on your graphics card and choose Update driver. Right-click on Like a Dragon Gaiden and select Properties. Click on the Local Files tab. Click on Verify Integrity of Game Files. Right-click on the executable and select Properties. Click on the Compatibility tab. Click Apply and then OK.
In Fantasy Strike, you just click on anyone in your in-game friends list to challenge them. You just click on them to challenge, and that’s it. You can play single-character matches or team battles, just like in local play. It’s intentional that you click once to challenge, they accept, then you are playing.
You can download the assets and the complete project for this tutorial by clicking on the button above. We’ll start with the Player_Character folder: Inside the Player_Character folder Right Click and create a new blueprint: The parent class is going to be Character: Name the blueprint BP_Player and open it in the editor window.
We organize all of the trending information in your field so you don't have to. Join 5,000+ users and stay up to date on the latest articles your peers are reading.
You know about us, now we want to get to know you!
Let's personalize your content
Let's get even more personalized
We recognize your account from another site in our network, please click 'Send Email' below to continue with verifying your account and setting a password.


Let's personalize your content