This site uses cookies to improve your experience. To help us insure we adhere to various privacy regulations, please select your country/region of residence. If you do not select a country, we will assume you are from the United States. Select your Cookie Settings or view our Privacy Policy and Terms of Use.
Cookie Settings
Cookies and similar technologies are used on this website for proper function of the website, for tracking performance analytics and for marketing purposes. We and some of our third-party providers may use cookie data for various purposes. Please review the cookie settings below and choose your preference.
Used for the proper function of the website
Used for monitoring website traffic and interactions
Cookie Settings
Cookies and similar technologies are used on this website for proper function of the website, for tracking performance analytics and for marketing purposes. We and some of our third-party providers may use cookie data for various purposes. Please review the cookie settings below and choose your preference.
Strictly Necessary: Used for the proper function of the website
Performance/Analytics: Used for monitoring website traffic and interactions
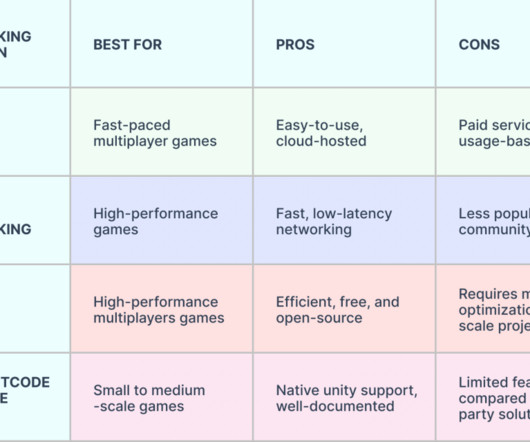
Its capabilities for VR content creation include comprehensive 3D modeling tools, advanced texturing and shading, animation and rigging, and integration with VR Devices. Draco 3D - 3D Optimization and Compression Tools Draco 3D is an open-source library by Google that is used to compress and decompress 3D geometric meshes and point clouds.
Through animation tools and code, each of the parts can be moved independently and the character animated. Each image part was converted to mesh. The USP of Spine animation software is how smoothly it converts an image part to mesh. In each mesh vertices are placed to define how we want to move the character.
The use of simple colliders should include box and sphere types instead of complex mesh colliders to minimize processing requirements. Using the Profiler allows developers to detect memory-intensive code sections which they should optimize. Simplify Rigs: Remove unnecessary controllers, constraints, and bones.
In a scene description format, materials can be contained in instances (as in, the instance is the mesh used, the transform in the world, and the material) or inside meshes (mesh comes with a material). does to meshes (the later). Nowadays, characters are rigged and animated using IK, not FK.
Systems, assets, and code paths are planned with the lowest viable target device in mind, including Xbox One S, Steam Deck, and mid-range Android hardware. Geometry: Build with LODs from the start, batch static meshes, and constrain polycounts based on hardware targets. Smarter code results in smoother gameplay.
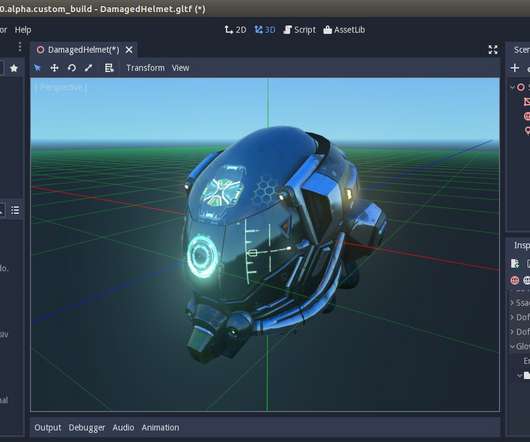
Has a bone based rig. Has no mesh modifiers. The armature and mesh objects are on Layer 1. In our case here we need to attach the material to our mesh instance: Select the mesh instance. Note that you can reconstruct the materials first and then assign it to a mesh instance, the order doesn't matter.
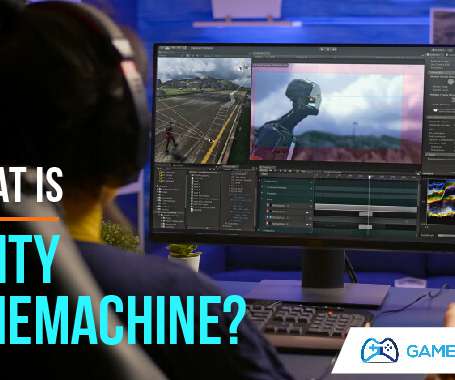
Coding camera angles for games and animation has been a pain … Until now. Before Unity Cinemachine, camera movement needed to be directly keyframed or, using code, had to be carefully scripted. You can even store cinematography data so it doesn’t need to be coded directly to the Unity camera you are currently using.
Talk: GDScript coding guidelines at GDQuest | Răzvan Cosmin Rădulescu ( razcore-art ). This flexibility comes with a cost: beginners struggle with knowing where to start while advanced users seek out coding patterns for simplifying their projects, picking the helpful path not necessarily being an easy task.
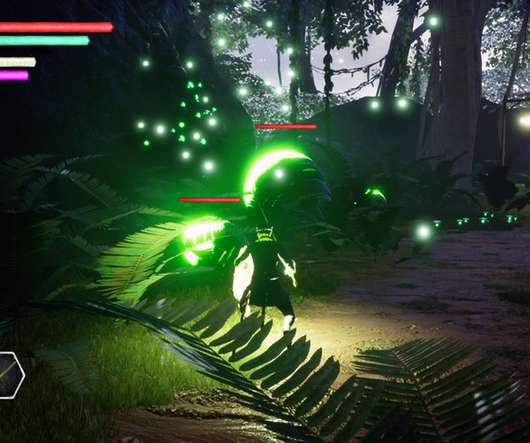
Becoming a Kristala Patron also means you'll unlock a special, secret code that'll gain you tons of bonus entries for our upcoming PS5 giveaway! This ultimately helps simplify our code and— the best part —can be applied to the entirety of the game’s programming. Rigging / Animation. BUT WAIT, THERE'S MORE!
An easier step would have been to simply transform the sculpted mesh into a new object in Cinema4d. I rigged the mesh according to the creature’s anatomy and tweaked around the settings for a while. He highlighted the fact that I used the same side view of the creatures in the shapes I created by code.
In the downloaded files you’ll find assets to follow with this tutorial and the complete project you can use as a reference to inspect the code. The only difference between this code and the one we’ve been using in previous tutorials is that we are using the ehnaced input action nodes. Important Information Before We Start.
We organize all of the trending information in your field so you don't have to. Join 5,000+ users and stay up to date on the latest articles your peers are reading.
You know about us, now we want to get to know you!
Let's personalize your content
Let's get even more personalized
We recognize your account from another site in our network, please click 'Send Email' below to continue with verifying your account and setting a password.


Let's personalize your content